Seat and License Management
Seats
Seats are tied to the organization or team they are purchased for and are shared among all related groups and subgroups. This means top-level group administrators do not have to allocate seats to specific instructors or groups.
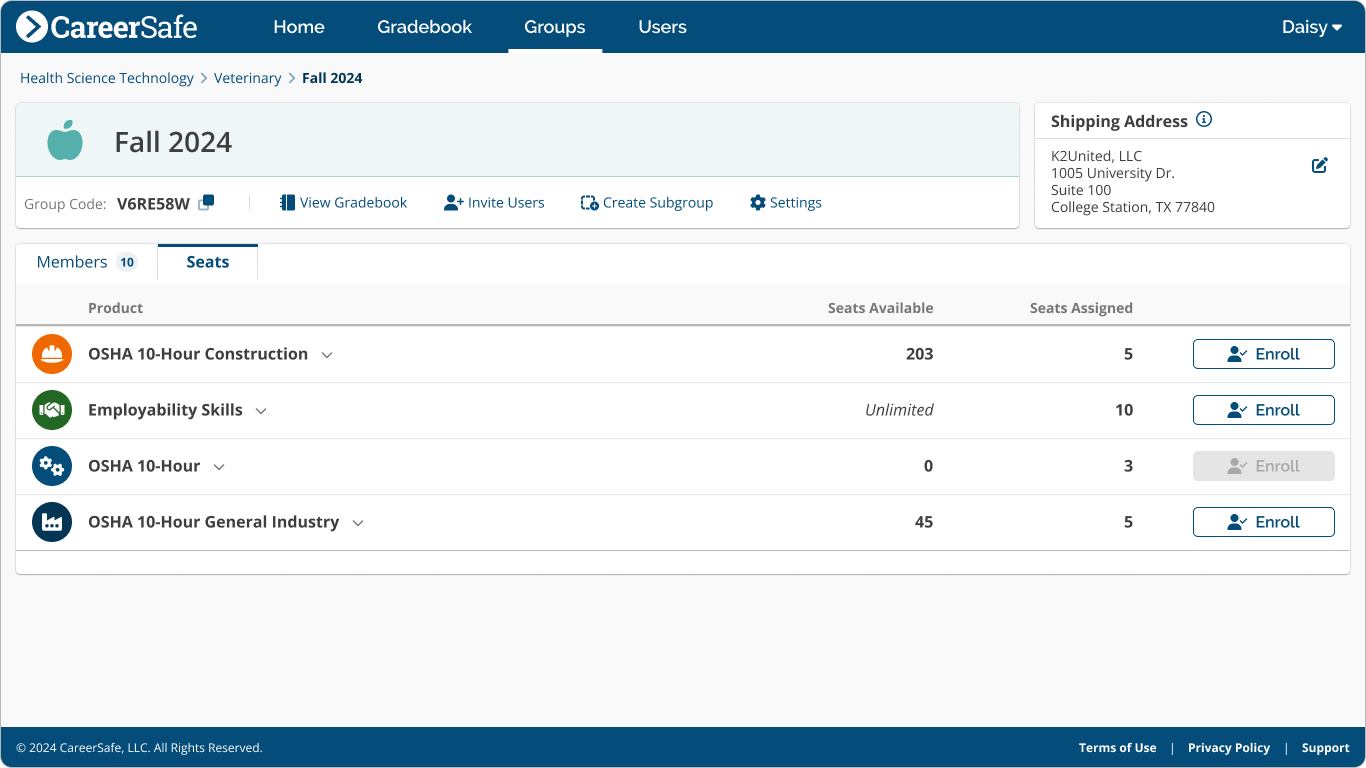
Group admins can view and enroll students in available seats in the Enrollments Tab of the Manage Group page.
What are the types of seats?
Single Course Seat
This type of seat provides access for one person to a single course. An example of this type of seat is OSHA 10-Hour Construction.
Multi-Course Seat
This type of seat provides access for one person to multiple courses. There are two types of multi-course seats.
- Multi-course, single enrollment — a single seat in one course from a library (e.g., a seat in the OSHA 10-Hour Library that allows a student to be enrolled in one variant of OSHA 10-Hour, selected at the time of enrollment)
- Multi-course, multi-enrollment — a single seat in multiple courses from a library (e.g., an Employability Skills library seat that allows the student to be enrolled in as many Employability Skills courses as desired)
Note: A helpful way to understand the difference between multi-course seat types is to think of a multi-course, single enrollment seat as a movie ticket to see a single movie from the available showings at a theater, whereas a multi-course, multi-enrollment seat is a streaming subscription that allows access to all movies in the service.
How do I purchase seats?
Seats can be purchased through the CareerSafe Catalog.
Pricing and product options are based on your account type (e.g., K-12 educational institutions will have access to discounted pricing and education-only products. Learn more about Course Purchasing.
Note: If an account has discounts available, they will automatically be applied at checkout.
How do I exchange seats?
If a student is enrolled in a course in the OSHA 10-Hour Training Library product, you can unenroll them from that course and enroll them in a different course in the library if the following conditions are met:
- the enrolled student has completed less than 50% of the course content;
- the student enrolled in the seat has not previously had the course reset.
Do my seats expire?
- A non-license seat can expire if no student is enrolled in it before the enrollment period ends.
- Seats with the earliest Enrollment End Date will automatically be used first when enrolling students.
- Seats assigned to enrolled students will not expire.
What is the Manage Seats page?
Available to all group administrators, the Manage Seats page provides at-a-glance access to information about seat distribution and expiration. This page also lets organizations that use Allocation distribute seats to specific groups. It can be accessed from the navigation bar in your CareerSafe Campus by clicking Manage, then Seats.
From this page, you can view and manage seat distribution and expiration per product for your organization or team.
The Manage Seats page is organized by product. To switch which product or course you’re viewing and managing:
- Click the Switch Products button at the top right.
- Select the product you’d like to view from the drop-down menu and click Submit.
The page will refresh, and you’ll see the details for the new product you’ve selected.
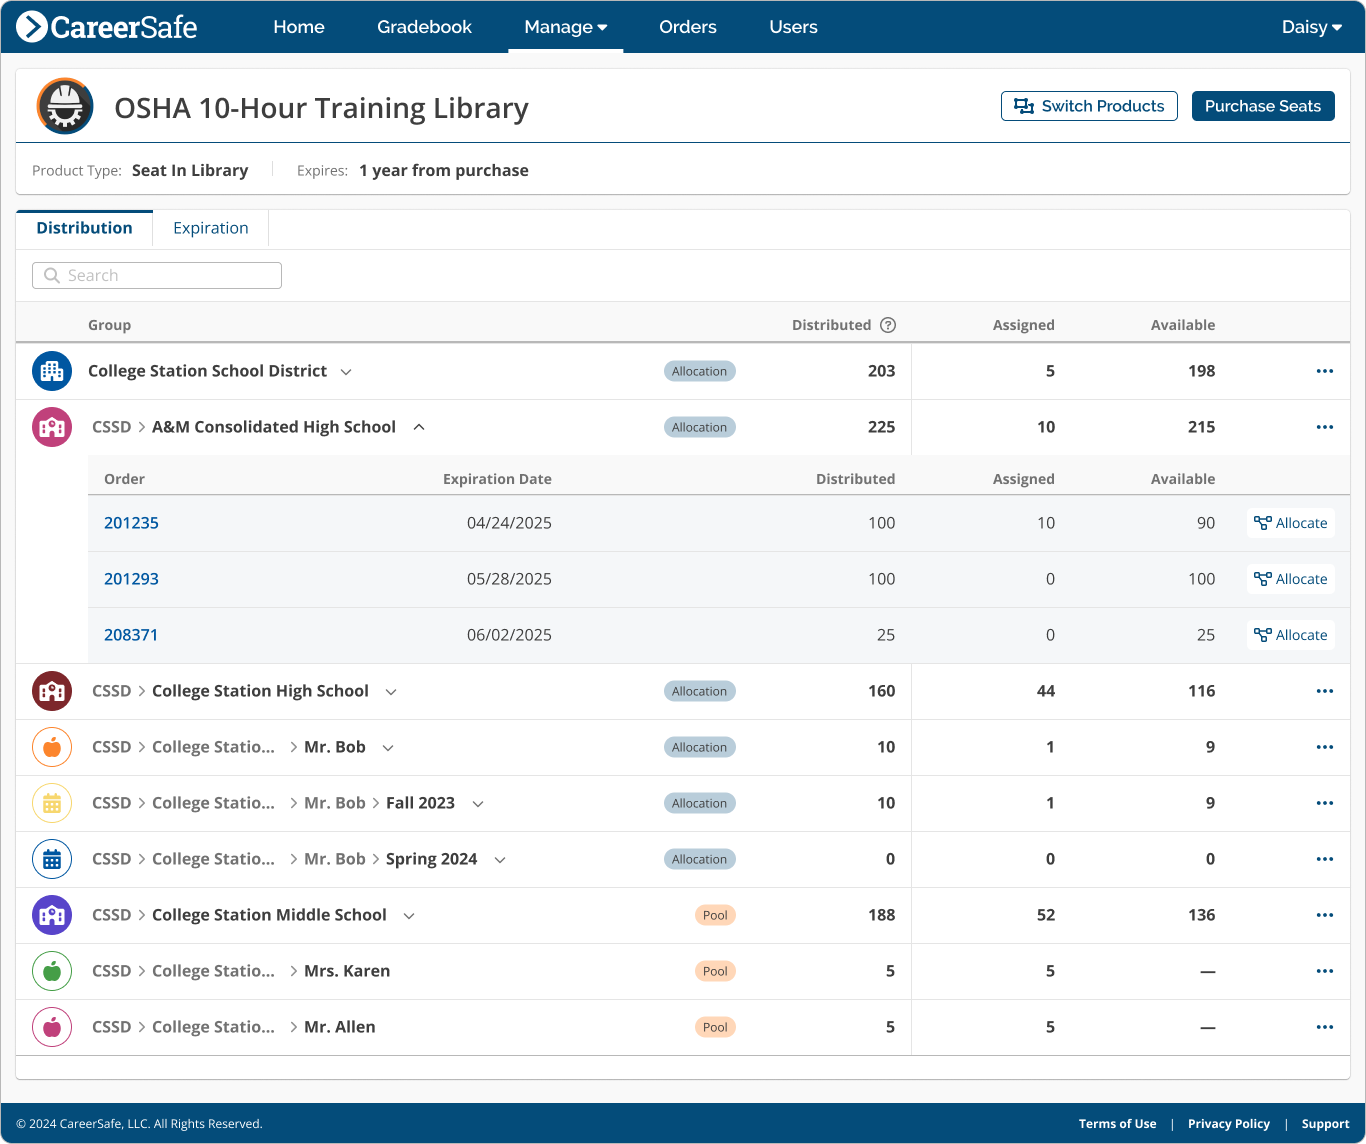
Distribution Tab
What does distribution mean?
Our distribution models refer to how seats are made available within organizations and groups. We offer two types of seat distribution models: Pool and Allocation. Administrators can select and set distribution methods on the Group Settings page in the Seat Distribution Card.
- POOL
Any seats in an organization or group set to Pool will also be available to all its sub-orgs and groups. Group administrators can enroll their members in any available seats. When a student is enrolled, they’ll automatically be enrolled in the seat expiring the soonest, which helps reduce the chance of seats lost to expiration.
Any sub-org or group below an organization set to Pool must also use the Pool method. For example, if a school district is set to Pool, all sub-orgs and groups below the district will automatically be set to Pool and will be unable to select Allocation as their distribution method. - ALLOCATION
The Allocation method allows organizations to distribute a certain number of seats to specific sub-orgs or groups. Administrators of those groups can only enroll members in seats that have been distributed to their group. This method provides more control over seat use and is beneficial for organizations that need to give a certain number of seats from a specific order to a particular group, teacher, school, etc.
If a top-level group is set to Allocation, that group can designate how far down the group tree they want to allocate. Sub-orgs or groups below a group set to Allocation can still choose to set their distribution method to Pool. If they do this, seats will not be able to be allocated to groups beneath this “top pool” group.
What can I do on the Distribution Tab?
This tab displays all the sub-orgs and subgroups within your organization (or subgroups within your team) for which you have administrator privileges, along with information about the distribution method and number of seats that sub-org or subgroup has available to them. You’ll also be able to see the source of the available seats and where seats have already been assigned. Below is an explanation of key components of the Distribution Tab:
- Distributed Seats: This is the number of seats allocated to this group for its members to be enrolled in (for groups set to Allocation).
- Available Seats: This number reflects the total number of seats available for use within an organization or group (i.e. District or School).
- Assigned Seats: This is the number of seats in each organization or group that have had a student enrolled in them and for which the enrollment window is still open.
Note: Seats with a student enrolled in them but for which the enrollment window has closed won’t be reflected in this number, as they are no longer “usable” seats (meaning, if you unenroll the student from the seat, the seat will become expired).
For groups using Allocation and the first group set to Pool below an Allocation group, clicking the Expand Icon next to an organization or group name allows you to view each of the orders tied to that group’s distributed seats.
How do I allocate seats?
Seats are allocated per order. For groups using Allocation and the first group set to Pool below an Allocation group, clicking the Expand Icon next to an organization or group name on your Manage Seats page allows you to view each of the orders tied to that group.
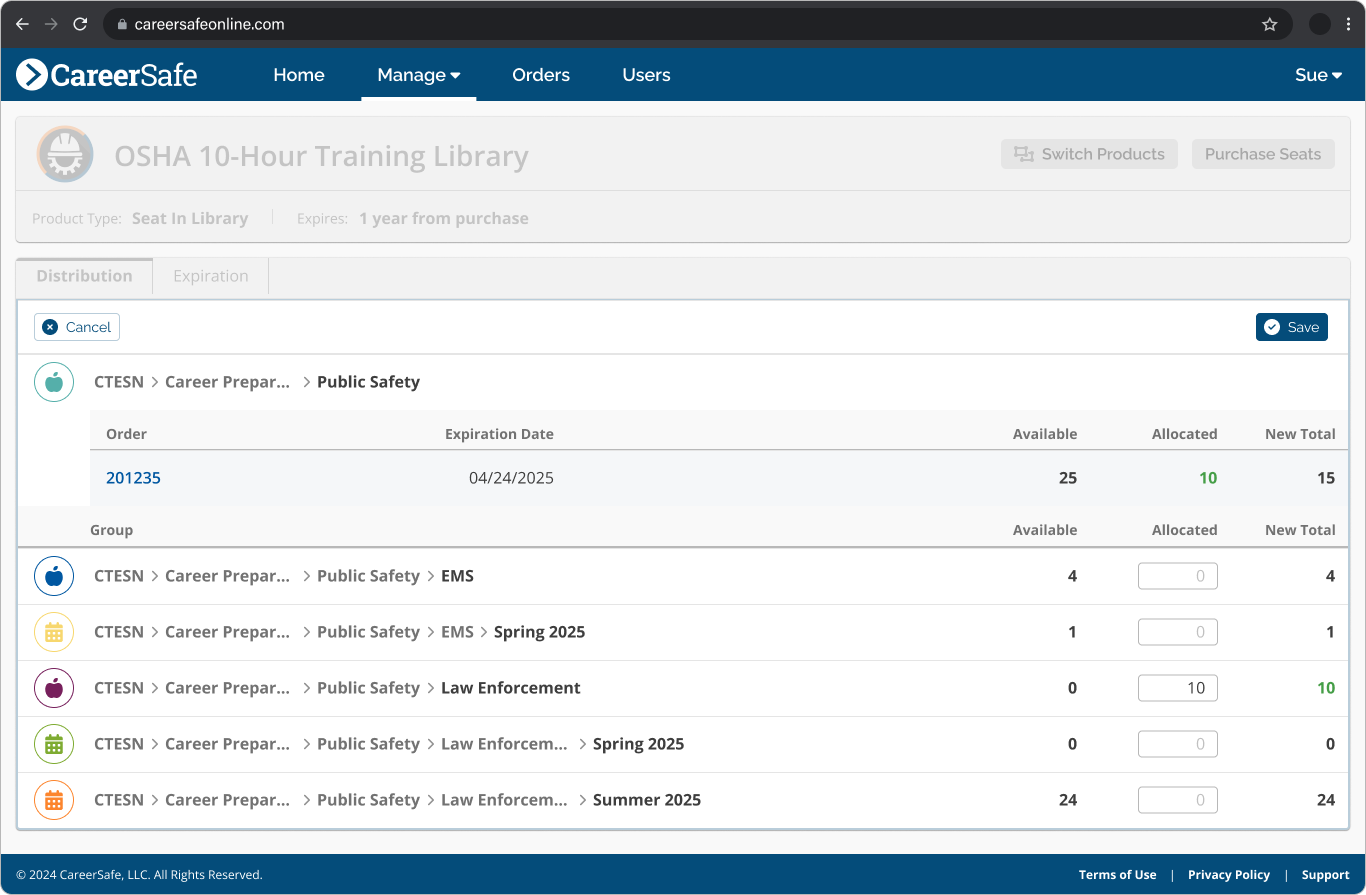
To allocate seats:
- Find the order you would like to allocate from and click the Allocate Icon at the right end of the order row.
- The Manage Seats page will become a form where you’ll be able to distribute seats to any group below the group you are distributing from.
- Enter the number of seats you would like to allocate to each available sub-group.
- Click Save.
- Verify everything in the modal is correct and click Allocate.
How do I recall seats?
If you have allocated seats to a group and want to re-distribute them, you can use the Recall Seats function.
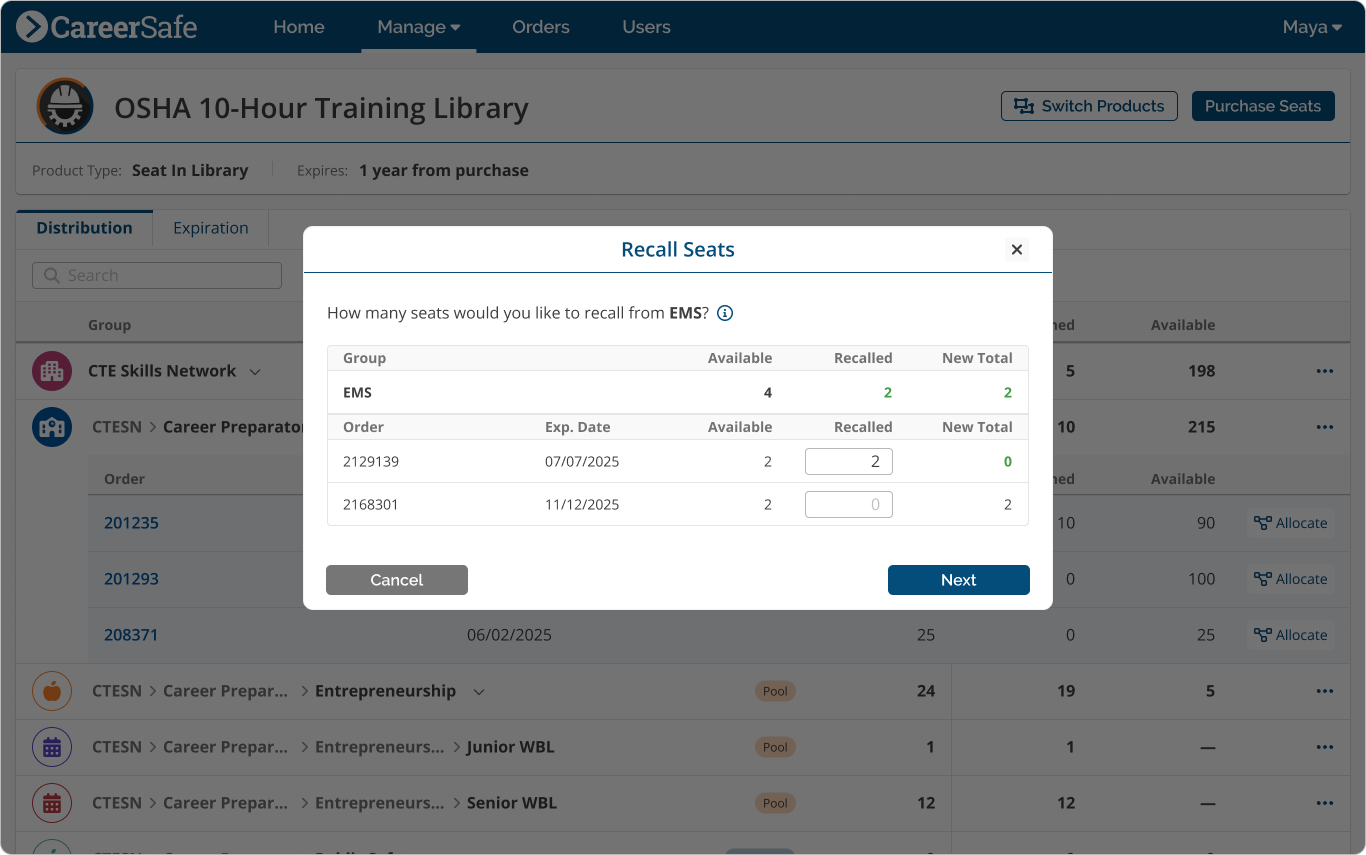
To recall seats:
- From the Manage Seats page, click on the More Actions Icon next to the group you’d like to recall seats from.
- Click Recall Seats.
Note: If Recall Seats is disabled, you can hover over it for a tooltip that will explain why you are not able to recall seats from the selected group. - Choose whether you’d like to recall all available seats from the selected group or a specific number of seats and click Next.
- Enter the number of seats you’d like to recall from each order with available and unexpired seats and click Next.
Note: The number of seats recalled from each order can’t be more than the total number of available seats for that order. - Verify the number of seats being recalled from each order and the group they are being recalled to is correct and click Recall.
Note: Seats are recalled to the highest level group for which you are an admin.
You’ll be returned to the Distribution Tab of the Manage Seats page, and any changes you made will be reflected there.
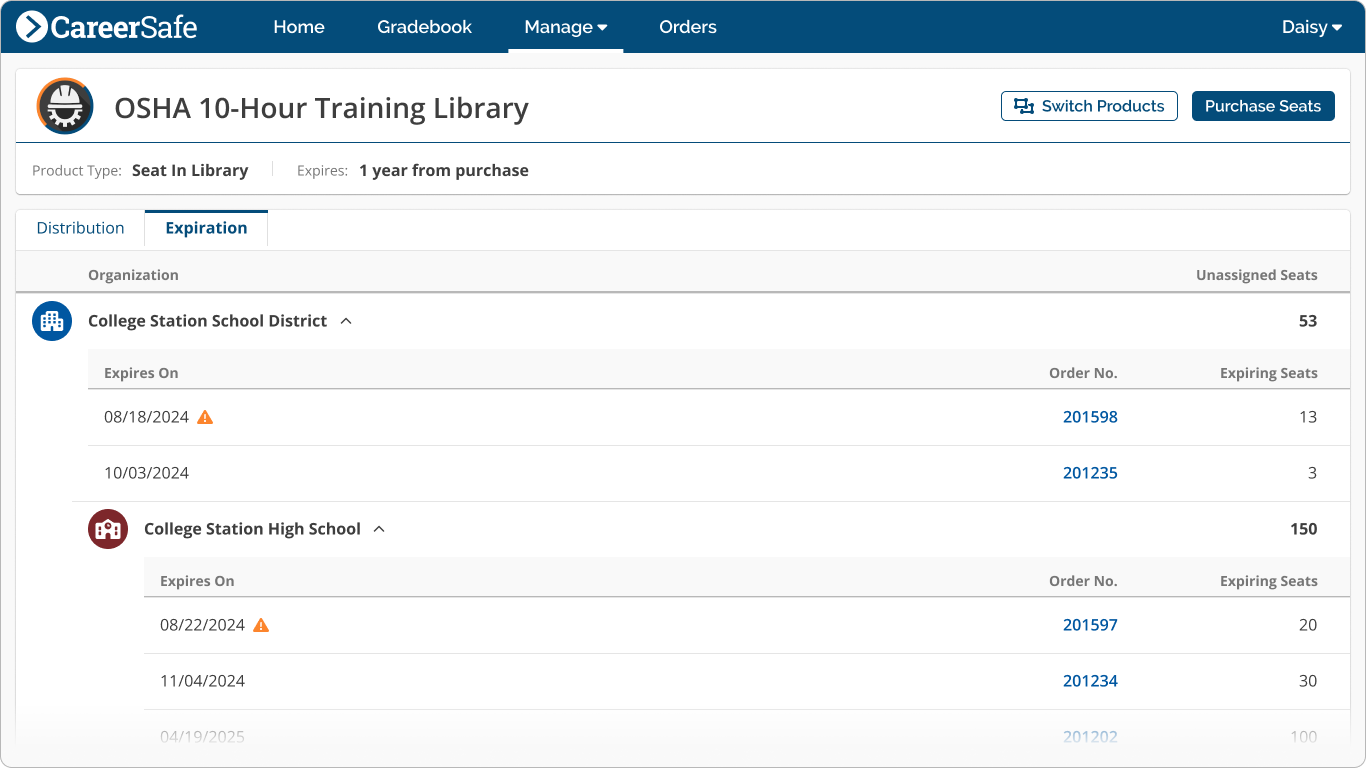
Expiration Tab
This tab is available to organization admins and provides information about your organization or team’s expiring seats, including the order number those seats are tied to, which sub-org or group placed the order, and how many seats are expiring in each order. Below is an explanation of key components of the Expiration Tab:
- Expires On: This is the date on which a group of seats expires, based on the order those seats were purchased in. An orange warning icon next to the date indicates that the expiration date is within six weeks.
- Order No: This shows the order number a group of expiring seats is tied to. Clicking the order number will take you to the Order Details page for that order.
Note: If an order number is not clickable, that means you don’t have access to view the order details (i.e., your District placed the order, and you are not a district administrator). - Unassigned Seats: This is the total number of unassigned seats at the organization, team, and sub-org levels.
- Expiring Seats: This shows the number of expiring seats per order an organization or sub-org has placed.
Licenses
A license gives a site (a single geographical business, corrections, or school location) unlimited seats in a group of courses.
- Education (K-12) School Licenses provide access for an entire school year, with the end of the school year defined as August 31 (i.e., a license purchased on September 1, 2025 is good for the 2025/26 school year and would expire on August 31, 2026).
- Business Site Licenses provide access for 365 days from the date of order processing.
How do I assign a license to site/school?
If you purchase a license on behalf of a specific site during the checkout process (e.g., you purchase as an individual school rather than the district), the license is automatically assigned to that site.
Alternatively, if you purchase a license without designating a specific site (e.g., you buy six licenses as a school district rather than as the individual schools), the organization admin can assign those licenses to sites (e.g., the schools the licenses will be used at) via the Manage Licenses page.
- From your navigation bar, click Manage, then Licenses.
- A table will display your available licenses.
- Select a license and click Assign.
- From the modal drop-down, select the site you’d like to assign a license to.
- Click Assign.
Once you have assigned a license, instructors and administrators for that site will be able to assign students to seats.